Creating a Repository
Creating a Repository
Now let's create a new repository for us to work on.
For convenience, we're going to work with some pre-existing template code that's already stored in a repository. The first thing we need to do is create our own copy of that template, which we can do on GitHub.
Go to our template repository and select Use this template:

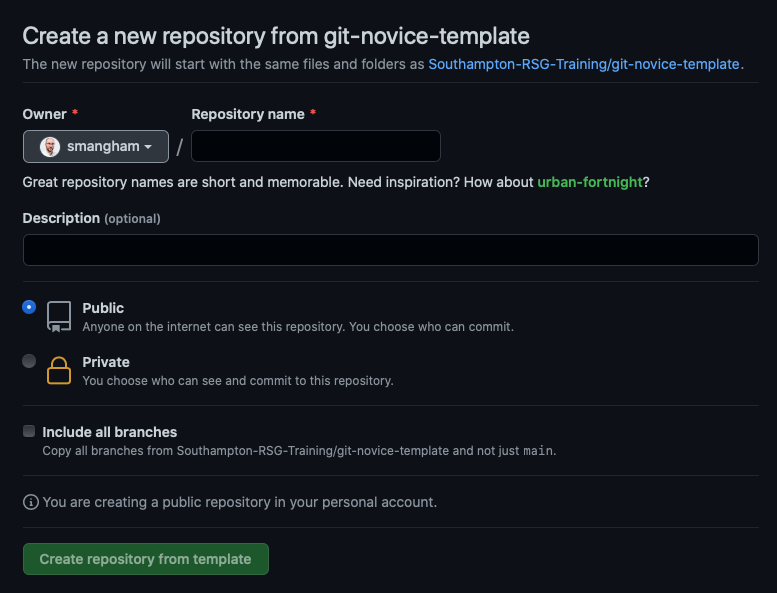
We should get prompted to give details for what we'd like our copy of the template to be called. As this demo code is for analysing climate data, we'll name our copy of it
climate-analysis. We also want it to be public, so anyone can see and copy our code:
Public or Private?
GitHub will allow you to create private repositories, so only people you specify can access the code, but it's always best to keep your code public - especially if you're going to use it in a paper!
Code that generates or analyses data is a fundamental part of your method, and if you don't include your full method in papers your work can't be reproduced, and reproducibility is key to the scientific process.
Always keep your repositories public unless you've got a strong reason, like embargoes imposed by industrial partners.
A major advantage of this is if you leave academia, or you switch institution and forget to update the email on your GitHub account before you lose your old one, your work won't be lost forever!
After a brief wait, GitHub will have created a remote repository - a copy of the files and their history stored on GitHub's servers.
Cloning the Repository
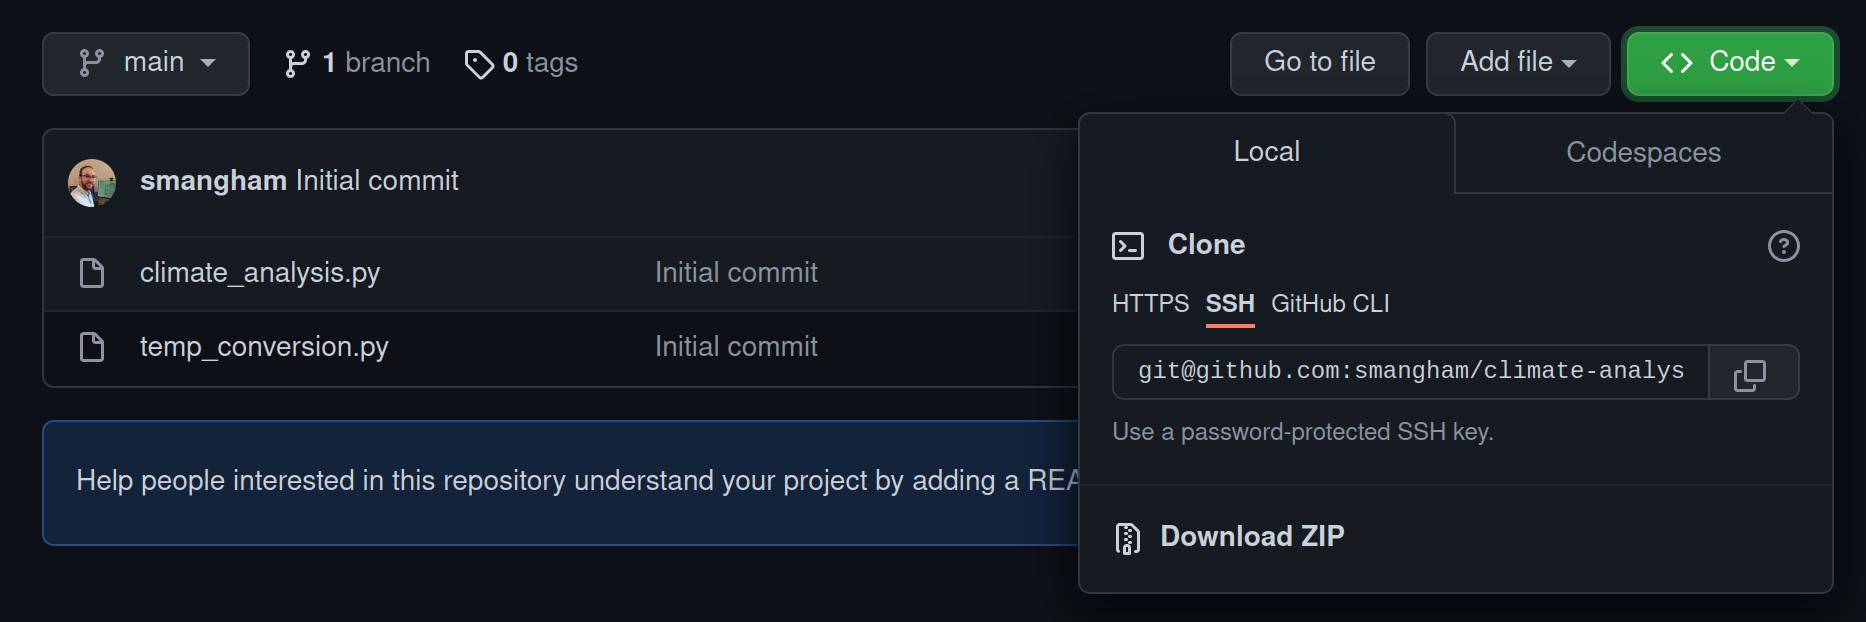
Next, from the new GitHub repository click on the code button, and you should have a choice of ways to copy the code. Select SSH, then click the copy button to copy the repository's URL:

Now we'll download a copy of the repository to our server.
SSH vs HTTPS
Make sure you select SSH! Whilst Git supports both HTTPS and SSH, GitHub will only let you download with HTTPS, as it's less secure.
We have our SSH key in place and have created our new repository from the template, so we can finally clone the repository to our machine. Type
git clone and then paste in the repository URL you copied above. It will look something like this with <your account name> differing depending on the name:git clone git@github.com:<your account name>/climate-analysis.git
After you enter the
git clone command, you should see:Cloning into 'climate-analysis'... The authenticity of host 'github.com (140.82.121.4)' can't be established. ECDSA key fingerprint is SHA256:p2QAMXNIC1TJYWeIOttrVc98/R1BUFWu3/LiyKgUfQM. ECDSA key fingerprint is MD5:7b:99:81:1e:4c:91:a5:0d:5a:2e:2e:80:13:3f:24:ca. Are you sure you want to continue connecting (yes/no)? yes
Then, when you're prompted, continue the connection with
yes and it will finish downloading:remote: Enumerating objects: 4, done. remote: Counting objects: 100% (4/4), done. remote: Compressing objects: 100% (4/4), done. remote: Total 4 (delta 0), reused 3 (delta 0), pack-reused 0 Receiving objects: 100% (4/4), done.
Now, if we use
ls to list the contents of the directory, we should see we have a new directory, called climate-analysis, that's a local repository containing the code from our remote repository. This is linked up automatically - making it easy for us to download updates to the remote repository, or to send our changes back up to it.What if I Accidentally Cloned the Repository using HTTPS?
As a note, if you've already cloned a repository you can check if you selected HTTPS as the access method using, e.g.:
cd climate-analysis git remote -v
origin git@github.com:yourname/climate-analysis (fetch) origin git@github.com:yourname/climate-analysis (push)
In this case, we're using SSH. If you see HTTPS, you can fix this with the following:
git remote set-url origin git@github.com:yourname/climate-analysis
Creating Repositories Locally
We've shown you how to create a repository on GitHub then download it via
git clone, but you don't have to do it that way.If you want, you can create a repository locally by entering any directory and using
git init. This turns any directory into a git repository, one stored entirely locally on your computer.
After you've used git init to turn a directory into a repository, you can use the other commands we introduce in this section to add files to it.We still want to make sure our local repository is linked to a remote repository on GitHub though! To do that, you can make an empty repository on GitHub and name it. Once you've got that, you can then connect your local repository to it using
git remote add origin git@github.com:yourname/repositoryname.git remote add tells your local repository to link up to a remote one, and origin git@github.com:yourname/repositoryname tells it that the remote is at git@github.com:yourname/repositoryname, and can be referred to as origin. You can link a local repository to many remote repositories if you want, but the main one is always called origin.Exploring a Repository
Now, let's change to our code directory and look at the files we just downloaded.
cd ~/climate-analysis ls
climate_analysis.py temp_conversion.py
These are some Python files for analysing climate data-
you'll recognise them if you've done some of our earlier lessons.
Don't worry, you don't need to know Python to follow along.
You'll notice that even though this directory is a version control repository, nothing actually looks special about it. But, if we add the
-a flag to show everything,
we can see that there's a hidden directory called .git:ls -a
. .. climate_analysis.py .git temp_conversion.py
Git stores information about the project in here.
If we ever delete it, we will lose the project's history.
Check Status
We can check that everything is set up correctly
by asking Git to tell us the status of our project with the status command:
git status
# On branch main nothing to commit, working tree clean
A branch is an independent line of development. We have only one, and the default name is main.
Our local repository is connected to a remote repository (called origin by default), and is currently up-to-date; we haven't made any changes to the code yet.
Git works on commits - snapshots of the current state of the repository. "nothing to commit, working tree clean" means that the directory currently looks exactly the same as the last snapshot we took of it, with no changes or edits.
Branch names
In this workshop, we have a default branch called main. In older versions of Git,
if you create a new repository on the command line, it'll have a default branch called master, and a lot of examples online will show master instead of main. Don't worry - branches work the same, regardless of what they're called!