Image Sharpening using HPC
Part 1: Introduction & Theory
Images can be fuzzy from random noise and blurrings.
An image can be sharpened by:
- detecting the edges
- combining the edges with the original image
These steps are shown in the figure below.
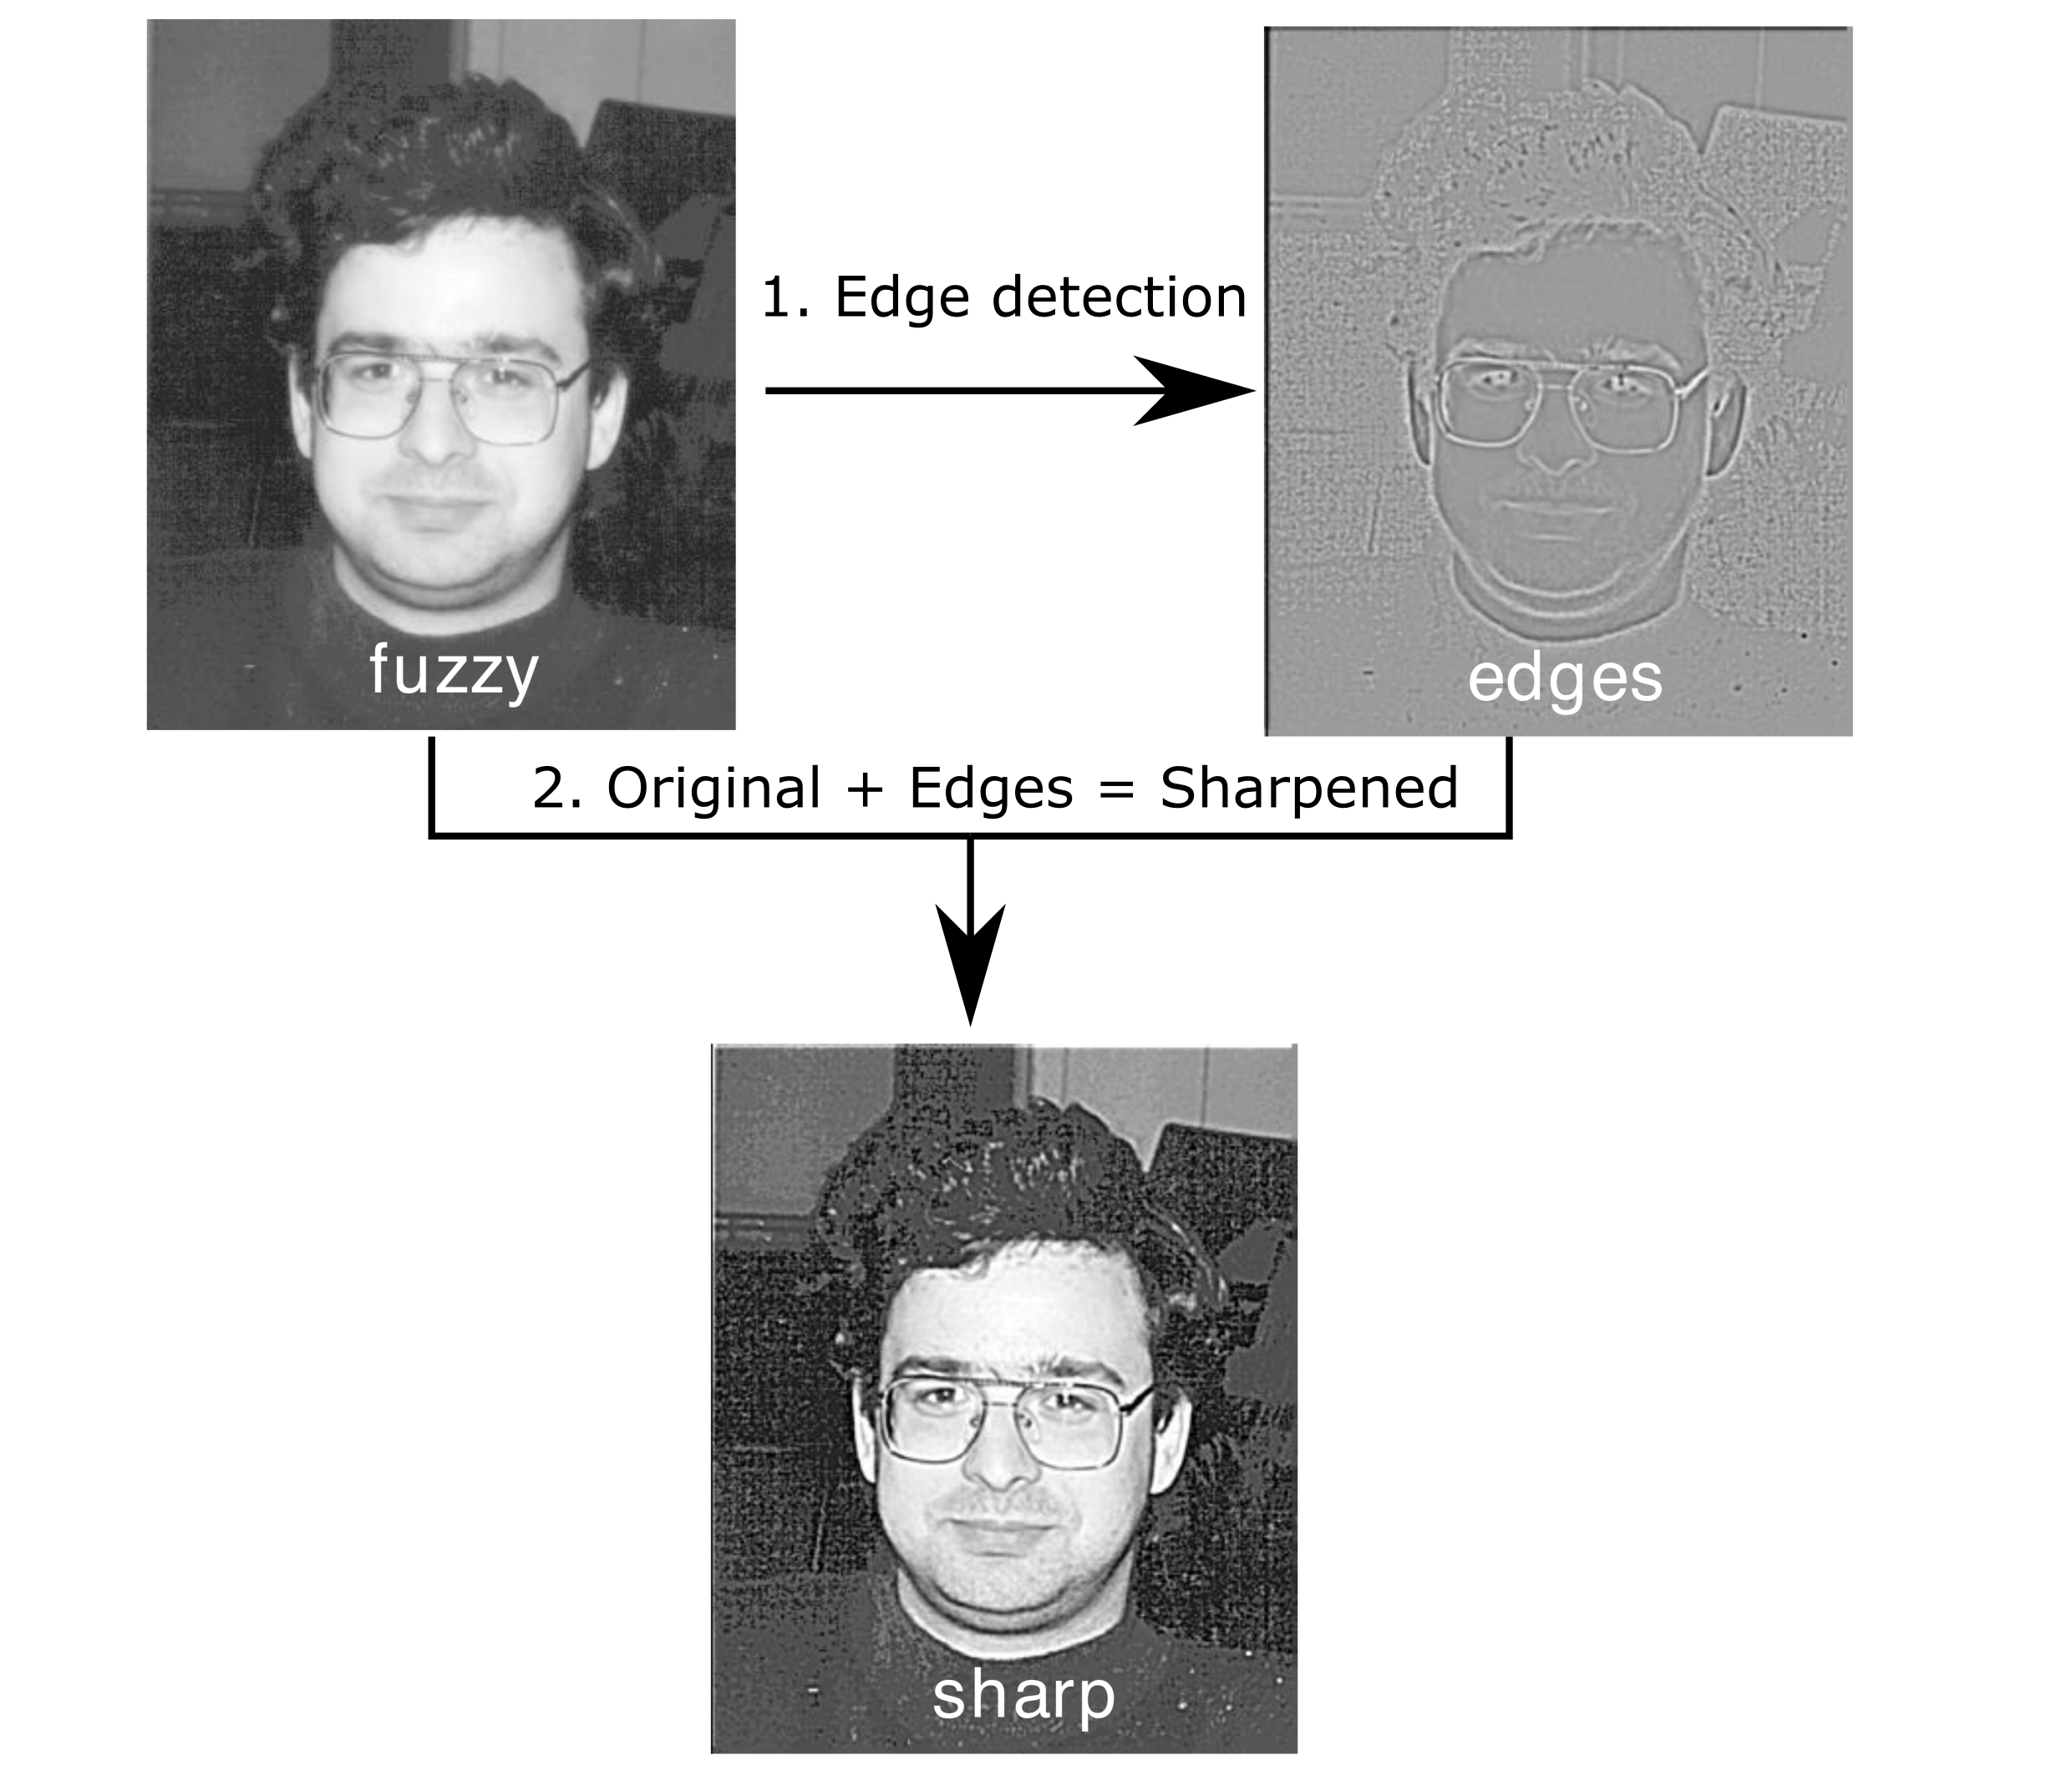 Image sharpening steps
Edge detection
Edges can be detected using a Laplacian filter. The Laplacian is the second spatial derivative of the image intensity . This means it highlights regions of rapid intensity change, i.e the edges.
In practice, the Laplacian also highlights the noise in the image and, therefore, it is sensible to apply smoothing to the image as a first step. Here we apply a Gaussian filter, this filter approximates each pixel as the weighted average of its neighbors.
The two operations can be combined to give the Laplacian of Gaussian filter .
These two functions and are graphed below.
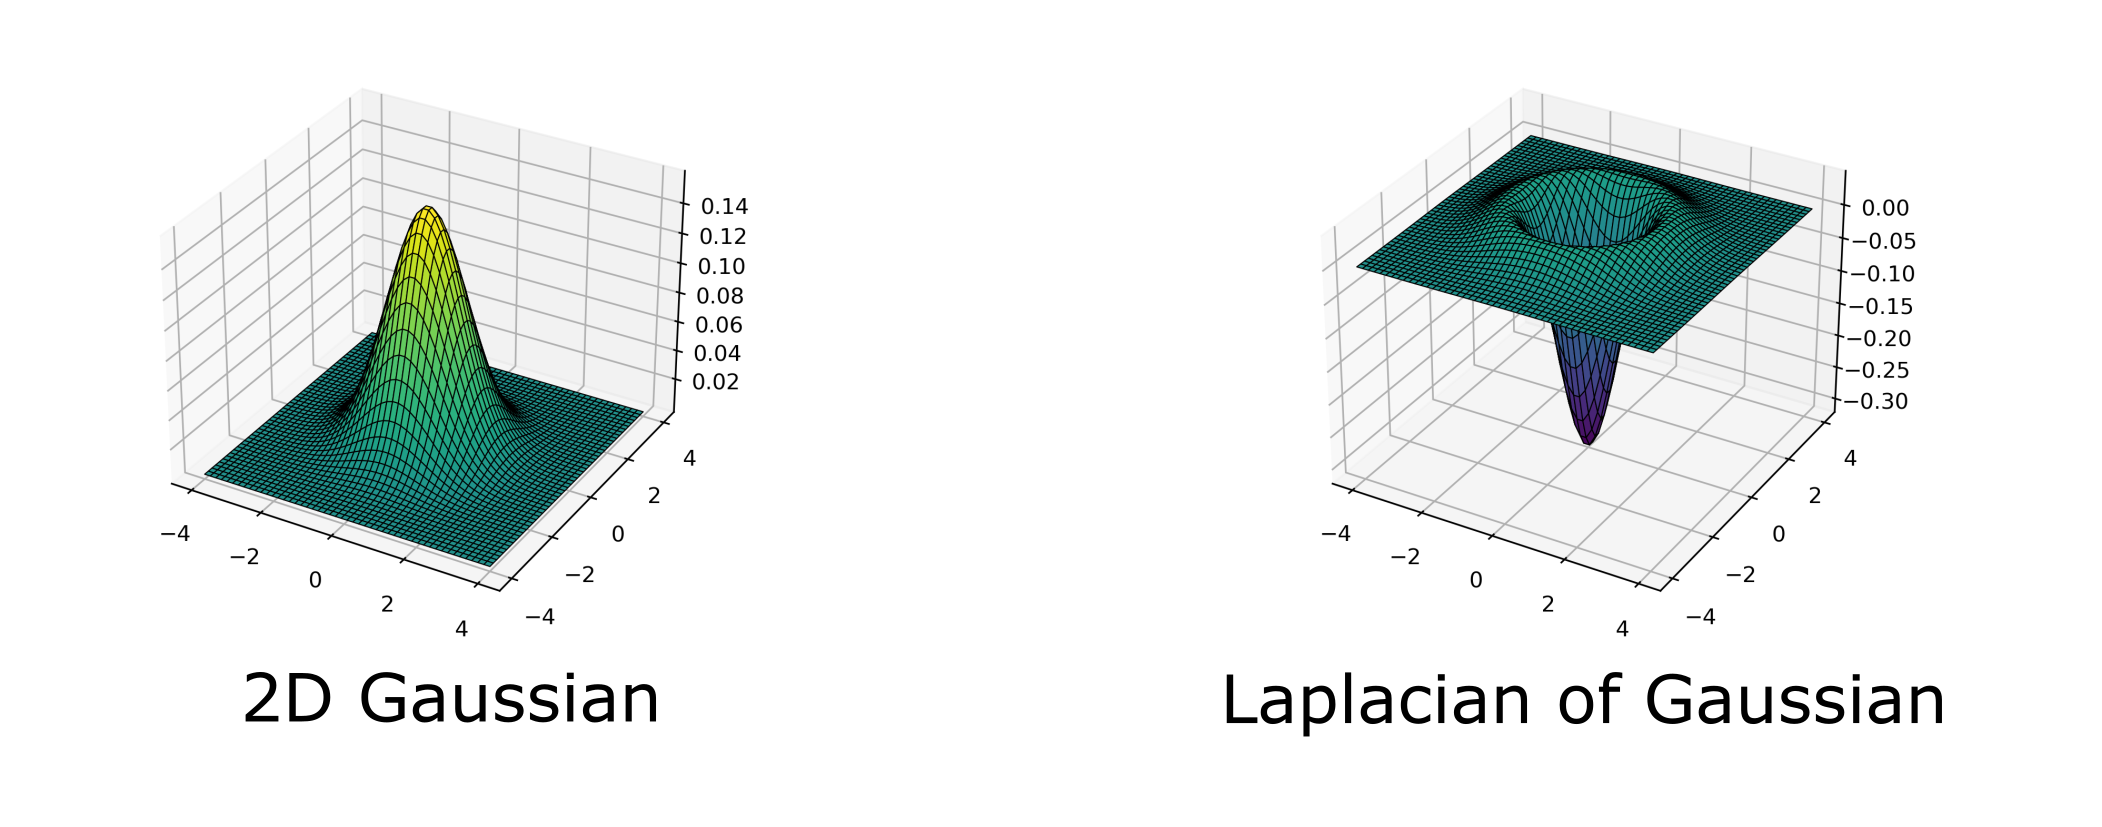 "Gaussian" and "Laplacian of Gaussian" filters
Implementation
To apply the filter to an image the filter must be turned into a discrete mask, that is a matrix of size 2d+1 x 2d+1 where d is an integer. We use d=8, therefore the filter is a 17x17 square, it looks like this:
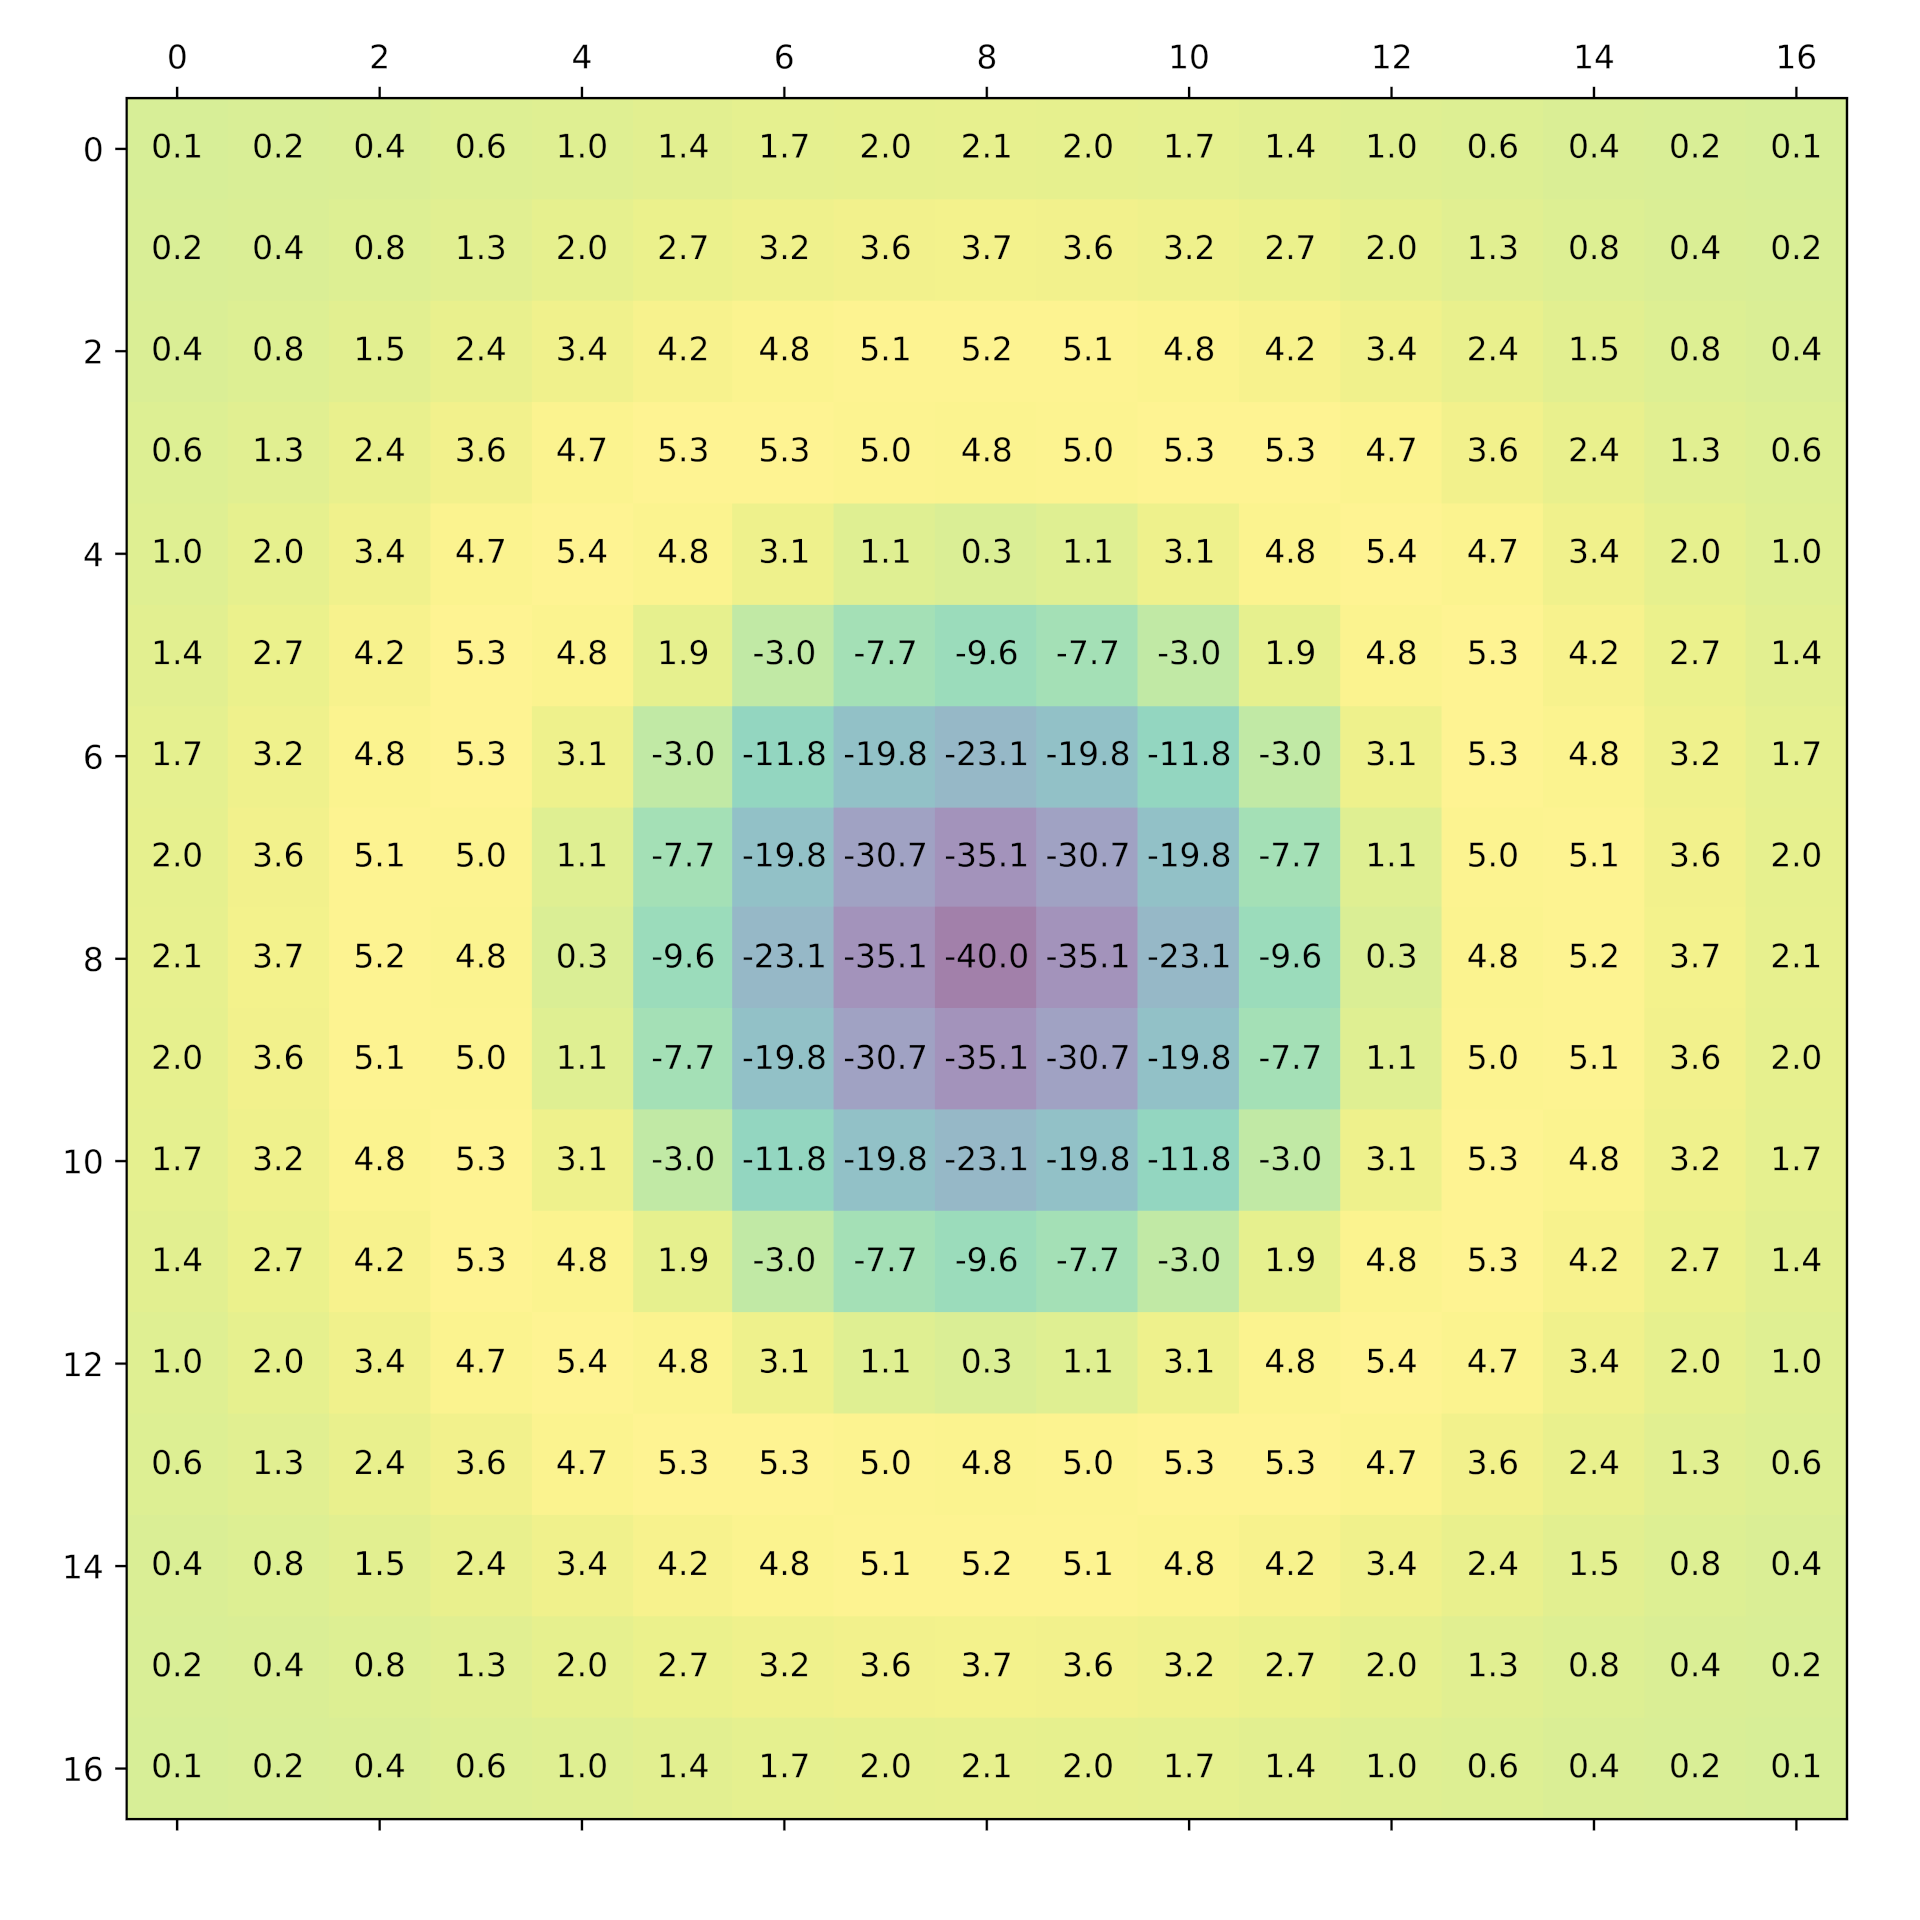 filter as a discrete mask
To perform the convolution of this filter with the original image, the following operation is performed on each pixel,
the sharpened image is then created by adding the edges to the original image, with a scaling factor (See the source code for the full details).
Part 2: Download, Compile, Run
Downloading the source code
In this exercise we will be using an image sharpening program which is available in a Github repository.
To download the code you will need to clone the repository, e.g.:
git clone https://github.com/UNIVERSE-HPC/foundation-exercises
Alternatively you might have already cloned the repository as part of another exercise in which case skip this step.
When you clone the repository the output will look similar to this:
Cloning into 'foundation-exercises'... remote: Enumerating objects: 131, done. remote: Counting objects: 100% (131/131), done. remote: Compressing objects: 100% (69/69), done. remote: Total 131 (delta 56), reused 127 (delta 55), pack-reused 0 Receiving objects: 100% (131/131), 366.62 KiB | 3.05 MiB/s, done. Resolving deltas: 100% (56/56), done.
You will now have a folder called
foundation-exercises. Change directory into where the sharpening code is located and list the contents:cd foundation-exercises/sharpen ls
Output:
C-MPI C-OMP C-SER F-MPI F-OMP F-SER
There are several version of the code, a serial version and a number of parallel versions both for the C language and for Fortran. Initially we will be looking at the serial version located in the
C-SER folder.Compiling the source code
We will compile the serial version of the source code using a Makefile.
Move into the
C-SER directory and list the contents.cd C-SER ls
Output:
cio.c dosharpen.c filter.c fuzzy.pgm Makefile sharpen.c sharpen.h sharpen.slurm utilities.c utilities.h
You will see various code files. The Makefile includes the commands which compile them into an executable program. To use the Makefile, type the
make command.make
Which Compiler?
If you're running this on your own machine or another HPC infrastructure,
you may find you get an error message about not being able to find the compiler, e.g.:
cc -O3 -DC_SERIAL_PRACTICAL -c sharpen.c make: cc: No such file or directory make: *** [Makefile:32: sharpen.o] Error 127
In which case, you can edit the file
Makefile, which contains the instructions to compile the code, and ensure it uses gcc instead.
Edit Makefile in an editor of your choice and replace the following line:CC= cc
with this one:
CC= gcc
and then save the file, and re-run
make.
In future practical sections you can perform the same change to makefiles if you encounter the same error.Output:
cc -O3 -DC_SERIAL_PRACTICAL -c sharpen.c cc -O3 -DC_SERIAL_PRACTICAL -c dosharpen.c cc -O3 -DC_SERIAL_PRACTICAL -c filter.c cc -O3 -DC_SERIAL_PRACTICAL -c cio.c cc -O3 -DC_SERIAL_PRACTICAL -c utilities.c cc -O3 -DC_SERIAL_PRACTICAL -o sharpen sharpen.o dosharpen.o filter.o cio.o utilities.o -lm
This should produce an executable file called
sharpen.Running the serial program
We can run the serial program directly on the login node:
./sharpen
You should see output similar to:
Image sharpening code running in serial Input file is: fuzzy.pgm Image size is 564 x 770 Using a filter of size 17 x 17 Reading image file: fuzzy.pgm ... done Starting calculation ... ... finished Writing output file: sharpened.pgm ... done Calculation time was 1.378783 seconds Overall run time was 1.498794 seconds
You should find an output file
sharpened.pgm which contains the sharpened image.Would you like to know more?
If you're interested in the implementation itself, take a look at the code - particularly
dosharpen.c.Viewing the images
If you're running this via your own machine, take a look at the produced image file named
sharpened.pgm.If however you're following this on an HPC infrastructure like ARCHER2, to view the sharpened image you'll need to copy the file to your local machine.
Fortunately, we can use the
scp (secure copy) command to do this over SSH.
From a terminal on your local machine or laptop:
Use the pwd command to output your current directory location, and use it with scp to copy the original and sharpened files over, e.g. on ARCHER2:scp username@login.archer2.ac.uk:/work/[project code]/[group code]/[username]/foundation-exercises/sharpen/C-SER/fuzzy.pgm . scp username@login.archer2.ac.uk:/work/[project code]/[group code]/[username]/foundation-exercises/sharpen/C-SER/sharpened.pgm .
Then you should be able to open and view the image file on your local machine.
What about viewing the file without copying?
Another way to view this file directly on an HPC resource, without copying it, is by installing an X Window client on your local machine and then log into the remote machine with X forwarding enabled.
Covering this in detail is beyond the scope of this course, although the ARCHER2 documentation on connecting has some information.
Submit sharpen to a compute node
Submitting to a compute node
To be able to run the job submission examples in this segment, you'll need to either have access to ARCHER2, or an HPC infrastructure running the Slurm job scheduler and knowledge of how to configure job scripts for submission.
Write a Slurm script to run sharpen on a compute node, and submit it.